Les notifications sous Android
Par
Nazim Benbourahla
Le but de ce tutoriel est d'apprendre à utiliser les notifications sous Android et de prévenir les utilisateurs de vos applications d'un événement particulier ou interagir avec eux.
1. Qu'est qu'une notification ?
2. Création de la vue principale
3. Rajouter le Listener sur les boutons
4. Création d'une notification
5. Suppression d'une notification
6. Conclusion
6. Remerciements
7. Liens
1. Qu'est qu'une notification ?
Une notification est une indication qui s'affiche sur la barre qui se situe en haut d'un téléphone Android. Cette notification sert à prévenir un utilisateur de certains évènements, comme la réception d'un message par exemple.
Nous allons créer un projet qui comprendra deux boutons :
-
un pour créer une
notification ;
- un autre pour en supprimer.
Commençons par créer un projet avec les données suivantes :
-
Nom du projet
: tuto_notification ;
- SDK : 2.1 ;
- Nom de l'application : Tuto Notification ;
- Nom du package : com.tutos.android.notification ;
- Activité : TutoNotificationHomeActivity ;
2. Création de la vue principale
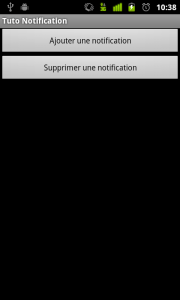
Nous allons modifier le fichier "main.xml"afin d'avoir deux boutons :
<?xml version="1.0" encoding="utf-8"?>
<LinearLayout xmlns:android="http://schemas.android.com/apk/res/android"
    android:orientation="vertical"
    android:layout_width="fill_parent"
    android:layout_height="fill_parent"
    >
<Button
    android:layout_width="fill_parent"
    android:layout_height="wrap_content"
    android:text="@string/add_notification"
    android:id="@+id/add_notification"
    />

<Button
    android:layout_width="fill_parent"
    android:layout_height="wrap_content"
    android:text="@string/delete_notification"
    android:id="@+id/delete_notification"
    />
</LinearLayout>
|
Le fichier "strings.xml" pour rajouter les différentes strings pour le texte des boutons :
<?xml version="1.0" encoding="utf-8"?>
<resources>
    <string name="add_notification">Ajouter une notification</string>
    <string name="delete_notification">Supprimer une notification</string>
    <string name="app_name">Tuto Notification</string>
</resources>
|
Voici le résultat que vous allez obtenir :
3. Rajouter le Listener sur les boutons
Nous allons rajouter des "Listeners" sur les boutons pour gérer le clic. Ce qui donnera sur la classe "TutoNotificationHomeActivity" :
package com.tutos.android.notification;

import android.app.Activity;
import android.os.Bundle;
import android.view.View;
import android.view.View.OnClickListener;
import android.widget.Button;
import android.widget.Toast;

public class TutoNotificationHomeActivity extends Activity {
    private Button addNotificationBtn;
    private Button deleteNotificationBtn;

    @Override
    public void onCreate(Bundle savedInstanceState) {
        super.onCreate(savedInstanceState);
        setContentView(R.layout.main);

        addNotificationBtn = (Button) findViewById(R.id.add_notification);
        addNotificationBtn.setOnClickListener(new OnClickListener() {

        @Override
        public void onClick(View arg0) {
        Toast.makeText(getBaseContext(), "Ajout d'une notification", Toast.LENGTH_SHORT).show();
        }
    });

        deleteNotificationBtn = (Button) findViewById(R.id.delete_notification);
        deleteNotificationBtn.setOnClickListener(new OnClickListener() {

        @Override
        public void onClick(View arg0) {
        Toast.makeText(getBaseContext(), "Suppression d'une notification", Toast.LENGTH_SHORT).show();
        }
    });
    }
}
|
4. Création d'une notification
Nous allons créer une méthode
"createNotification
"
qu'on appellera au clic sur le bouton
"Ajouter une notification
"
. Voici
à
quoi ressemble cette méthode :
private final void createNotification(){
final NotificationManager notificationManager = (NotificationManager)getSystemService(Context.NOTIFICATION_SERVICE);
final Notification notification = new Notification(R.drawable.notification, notificationTitle, System.currentTimeMillis());
final PendingIntent pendingIntent = PendingIntent.getActivity(this, 0, new Intent(this, TutoNotificationHomeActivity.class), 0);
final String notificationTitle = getResources().getString(R.string.notification_title);
final String notificationDesc = getResources().getString(R.string.notification_desc);
notification.setLatestEventInfo(this, notificationTitle, notificationDesc, pendingIntent);
notification.vibrate = new long[] {0,200,100,200,100,200};
notificationManager.notify(NOTIFICATION_ID, notification);
}
|
Je vous mets l'icône que j'ai
utilisée
pour la notification
ici
.
Il suffit maintenant d'appeler la méthode dans votre code, ce qui donnera :
addNotificationBtn = (Button) findViewById(R.id.add_notification);
      addNotificationBtn.setOnClickListener(new OnClickListener() {

      @Override
      public void onClick(View arg0) {
      createNotification();
      }
  });
|
Il faut rajouter la permission "
Vibration
" dans l'
AndroidManifest.xml :
<uses-permission android:name="android.permission.VIBRATE" />
|
et les nouveaux textes dans le fichier "Strings.xml"
:
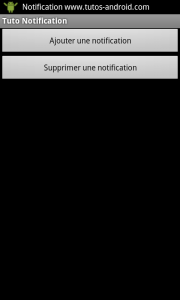
<string name="notification">Notification www.tutos-android.com</string>
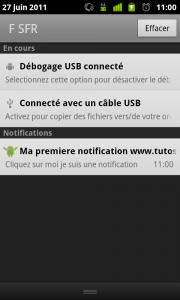
<string name="notification_title">Ma première notification www.tutos-android.com</string>
<string name="notification_desc">Cliquez sur moi je suis une notification</string>
|
5. Suppression d'une notification
Nous allons créer une méthode "
deleteNotification
", pour supprimer notre notification depuis l'application :
private void deleteNotification(){
final NotificationManager notificationManager = (NotificationManager)getSystemService(Context.NOTIFICATION_SERVICE);
notificationManager.cancel(NOTIFICATION_ID);
}
|
Puis l'appeler dans le code Java au moment du clic
:
deleteNotificationBtn = (Button) findViewById(R.id.delete_notification);
        deleteNotificationBtn.setOnClickListener(new OnClickListener() {

        @Override
        public void onClick(View arg0) {
        deleteNotification();
        }
    });
|
Vous pouvez trouver
ici
le projet réalisé durant ce tuto.
6. Conclusion
En espérant que ce tutoriel vous aura aidé à comprendre comment fonctionnent les notifications sous Android.
6. Remerciements
Je tiens à remercier tout particulièrement
plegat qui a mis ce tutoriel au format Developpez.com.
Merci également à
ClaudeLELOUP d'avoir pris le temps de le relire et de le corriger.
7. Liens


Les sources présentées sur cette page sont libres de droits
et vous pouvez les utiliser à votre convenance. Par contre, la page de présentation
constitue une œuvre intellectuelle protégée par les droits d'auteur. Copyright ©
2011 Benbourahla Nazim. Aucune reproduction, même partielle, ne peut être
faite de ce site ni de l'ensemble de son contenu : textes, documents, images, etc.
sans l'autorisation expresse de l'auteur. Sinon vous encourez selon la loi jusqu'à
trois ans de prison et jusqu'à 300 000 € de dommages et intérêts.


